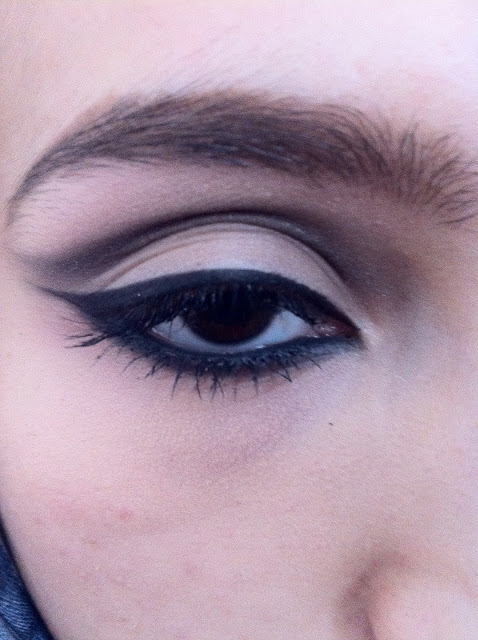
Ok, so heres a suprise.. One of the most famous looks worn by celebrities such as Kim.K and on runways and I have never tried this look on myself. Because its black and is all over my lid, I felt if I wore it, it would make my eyes appear small and be too dark. So i thought why not try it out, if it looks wrong I can wipe it off. I have to say it didnt look too bad. I did the shape winged so it elongated my eyes, will definately be wearing this look at a party or occasion!
For you lovely people who want to try this out, my number one tip to have it looking perfect is blend blend blend. Work in circular motions with your brush to make that black eyeshadow dissolve out. To get the perfect wing apply tape from your lower lashline following it up, when you remove the tape after your done you will have a clean crisp edge! If you have sensitive eyes and tape is a bit too much then use a wipe following your lower lashline going up this will give you a crisp edge too. Because we are using black eyeshadow I suggest doing foundation after because you may get fallout but to prevent this press the eyeshadow on with a densley packed brush on to your lid rather than sweeping the brush along your lid.
Thursday, 2 August 2012
Wednesday, 1 August 2012
Illamasqua Rich Liquid Foundation Review
Hey guys, so to all of you who read my blog, follow me on instagram and all that good stuff will already know when I apply my base when doing looks (on myself or on clients) I swear by the Illamasqua rich liquid.
By no fail when doing a dramatic look I ALWAYS use this foundation! On clients especially using this foundation is more convenient for me because it is so full coverage I don't need to use tons of concealor to get a flawless finish. In fact I don't use much of this foundation at all to get a really good result because it is so pigmented- which is saving me lots of money!
For those of you out there who are looking for a full coverage foundation I 110% recommend Illamasqua rich liquid foundation, retailing at £21.50 for 30ml it is not badly priced at all! Unless you have really really really bad skin you will not use more than a small pea amount. I suggest mixing the foundation with moisturiser or another foundation for good smooth results. This foundation can cling to dry patches on the face so make sure you moisturise fully before using this.
I honestly can't rave about this foundation enough! I know some people use it as a concealor because of its thick consistency. I think this foundation is great for anyone to keep in their makeup kit so when they are having a bad skin day they can pop a bit into their regular foundation for extra coverage, or apply it on problem areas or even keep it for special occasions like weddings or parties when we want our skin to look perfect. This foundation also pictures really well, it has a matt finish so is excellent for oily skins. Illamasqua have a great shade range starting at white to black (literally)! Their foundations either have a pink, yellow or neutral undertone which is great-because we can actually find our skin colour!
Investing in the pure white foundation can be a handy tool if you have really fair skin and can never find the right shade, then you can add the white to lighten your foundations. I find it hard to find foundations with a really strong yellow undertone as even neutral undertones are too pink for my skin because I am so yellow! So I use the Illamasqua rich liquid in RF140 which has a strong yellow undertone which i mix with my foundations to get my desired shade.
Overall I feel words can't express my love for this foundation because I can't imagine not having it in my kit, I have used it on skin with acne, redness, sensitivity, pigmentation and it has not failed me! £21.50 is a total bargain for what your getting in this bottle. This is so full coverage I've even used it to cover out eyebrows. Now.. some of you may find that scary but you need such a tiny tiny amount for a full coverage look! Literally a dot on the back of your hand which means this bottle will last you forever!
Breathe...
Take my advice and if your unhappy about your skin or you're looking for a full coverage foundation try the rich liquid, ask for a sample at your local Illamasqua counter I'm not sure if they give samples but theres no harm in asking!
![]() |
| RRP-£21.50 |
For those of you out there who are looking for a full coverage foundation I 110% recommend Illamasqua rich liquid foundation, retailing at £21.50 for 30ml it is not badly priced at all! Unless you have really really really bad skin you will not use more than a small pea amount. I suggest mixing the foundation with moisturiser or another foundation for good smooth results. This foundation can cling to dry patches on the face so make sure you moisturise fully before using this.
I honestly can't rave about this foundation enough! I know some people use it as a concealor because of its thick consistency. I think this foundation is great for anyone to keep in their makeup kit so when they are having a bad skin day they can pop a bit into their regular foundation for extra coverage, or apply it on problem areas or even keep it for special occasions like weddings or parties when we want our skin to look perfect. This foundation also pictures really well, it has a matt finish so is excellent for oily skins. Illamasqua have a great shade range starting at white to black (literally)! Their foundations either have a pink, yellow or neutral undertone which is great-because we can actually find our skin colour!
Investing in the pure white foundation can be a handy tool if you have really fair skin and can never find the right shade, then you can add the white to lighten your foundations. I find it hard to find foundations with a really strong yellow undertone as even neutral undertones are too pink for my skin because I am so yellow! So I use the Illamasqua rich liquid in RF140 which has a strong yellow undertone which i mix with my foundations to get my desired shade.
Overall I feel words can't express my love for this foundation because I can't imagine not having it in my kit, I have used it on skin with acne, redness, sensitivity, pigmentation and it has not failed me! £21.50 is a total bargain for what your getting in this bottle. This is so full coverage I've even used it to cover out eyebrows. Now.. some of you may find that scary but you need such a tiny tiny amount for a full coverage look! Literally a dot on the back of your hand which means this bottle will last you forever!
Breathe...
Take my advice and if your unhappy about your skin or you're looking for a full coverage foundation try the rich liquid, ask for a sample at your local Illamasqua counter I'm not sure if they give samples but theres no harm in asking!
Visit Illamasqua for more details on the rich liquid and check out their other products (you will not be disappointed)!
Have you tried the rich liquid foundation? What are your thoughts on it and what are your favourite Illamasqua products?
Let me know in the comments below!
Love Always
xxx
Sanna
Tuesday, 31 July 2012
Dramatic Cat eye look
So my birthday is coming up soon and I like to plan what makeup I'm going to wear for my makeup days before because I'm sad like that. I normally don't really do anything different on my birthday with my makeup, but this year I wanted to do a bit of eyeshadow nothing too drastic but still dramatic.
Heres what I came up with. Don't forget to comment and tell me what you think!
![]() |
| The lighting is really bad! But a iPhone shot of the eyes |
Monday, 30 July 2012
What I did on the weekend
So this weekend, I helped a friend out with her A level photography work.
She needed to do food-related images.
Skittles was the first thing that popped into my head. I thought why not do rainbow tears, rainbow lips or rainbow eyes! I tried all of these looks out. I also thought a fairytale theme would be awesome. I thought if I did a really dark witch, she could photograph her holding a apple (like snow white)!
I couldn't wait to show you guys who read my blog, so here are some of my iPhone shots, the actual pictures I will put on as soon as my friend sends them to me. I will either update this post with the new pictures or I will make a new blogpost with all the pictures from the shoot
I didn't manage to get really good pictures of the makeup because I was really busy doing the models sorry!
She needed to do food-related images.
Skittles was the first thing that popped into my head. I thought why not do rainbow tears, rainbow lips or rainbow eyes! I tried all of these looks out. I also thought a fairytale theme would be awesome. I thought if I did a really dark witch, she could photograph her holding a apple (like snow white)!
I couldn't wait to show you guys who read my blog, so here are some of my iPhone shots, the actual pictures I will put on as soon as my friend sends them to me. I will either update this post with the new pictures or I will make a new blogpost with all the pictures from the shoot
I didn't manage to get really good pictures of the makeup because I was really busy doing the models sorry!
![]() |
Friday, 27 July 2012
Fun with makeup! 'Diamonds are a girls best friend...'
I feel like I haven't played with makeup for ages!
So today I created a look using my dramatic Illamasqua eyelashes I bought online.
At first I thought I would do a glitter attack makeup but then I thought why not create a party look. So I chose to do a dramatic arabic black & silver smokey eye as I have never used them colours together by themselves.
Im sorry I find it really hard to go step by step on dramatic looks as i have to take a picture every 2 seconds and can't really put my all into it.
Soon I will be starting youtube tutorials on my channel LOOKAMILLION so I can recreate looks on there and show you how to achieve them.
These lashes were so heavy! At least they did the look justice!
Here are some pictures..
So today I created a look using my dramatic Illamasqua eyelashes I bought online.
At first I thought I would do a glitter attack makeup but then I thought why not create a party look. So I chose to do a dramatic arabic black & silver smokey eye as I have never used them colours together by themselves.
Im sorry I find it really hard to go step by step on dramatic looks as i have to take a picture every 2 seconds and can't really put my all into it.
Soon I will be starting youtube tutorials on my channel LOOKAMILLION so I can recreate looks on there and show you how to achieve them.
These lashes were so heavy! At least they did the look justice!
Here are some pictures..
What do you think? Will you be trying this out?
Follow me on Instagram, I upload pictures of looks on there too! @itsannaaa
Leave a comment with your thoughts below
Love always
xxx
Sanna
Thursday, 26 July 2012
More makeup goodies
Love for Mac and Illamasqua!
I don't know if any of you have guessed yet but my favourite all time brand is Illamasqua! (I might do my next blogpost on this brand as many of you haven't heard of it or know how wicked their products are!).
So seeing as Illamasqua have got a summer sale (60% off selected lines!!), I thought I would buy some things I have been eyeing up... (keeping in mind Ive already bought things from the sale 3 times already!!).
I just couldn't resist.
The prices are crazy and the products are to die for!
To visit the Illamasqua sale and buy your high end makeup at drugstore prices click here
I also bought 2 products from mac online so thought I would share my thoughts on that with you too.
This illuminator is amazing. Its colour reminds me of the famous Nars orgasm blush or even better the Nars orgasm multiple. Its a gorgeous hot pink with a gold sheen running through it. It would be good as a everyday highlighter by applying a small amount and patting into the tops of the cheekbones, or good for a occasion as it can be worn sort of like a paint and then left to dry (like nail polish) and will leave a gorgeous pigmented finish. I think it would be good for oily skin as well as dry because it doesn't budge and drys to a glowing finish without any extra moisture added to the skin.
I don't know if any of you have guessed yet but my favourite all time brand is Illamasqua! (I might do my next blogpost on this brand as many of you haven't heard of it or know how wicked their products are!).
So seeing as Illamasqua have got a summer sale (60% off selected lines!!), I thought I would buy some things I have been eyeing up... (keeping in mind Ive already bought things from the sale 3 times already!!).
I just couldn't resist.
The prices are crazy and the products are to die for!
To visit the Illamasqua sale and buy your high end makeup at drugstore prices click here
I also bought 2 products from mac online so thought I would share my thoughts on that with you too.
This illuminator is amazing. Its colour reminds me of the famous Nars orgasm blush or even better the Nars orgasm multiple. Its a gorgeous hot pink with a gold sheen running through it. It would be good as a everyday highlighter by applying a small amount and patting into the tops of the cheekbones, or good for a occasion as it can be worn sort of like a paint and then left to dry (like nail polish) and will leave a gorgeous pigmented finish. I think it would be good for oily skin as well as dry because it doesn't budge and drys to a glowing finish without any extra moisture added to the skin.
![]() |
| Illamasqua illuminator in fondle |
I have been looking at the decadence eyelashes for ages! I thought they would be amazing for a wacky look or even better for a party with just winged liner and nude lips. Im so glad they were on sale! I had to cut them short on the ends though because they were too long! They came in a set with this gorgeous nude colour liquid liner with small particles of purple glitter shot through it. Very unique-looking foreword to using this in looks!
![]() |
| Illamasqua midnight decadence |
I love the Illamsqua lipstick formulas and on myself only wear matt lips. This colour is stunning a pink lipstick with a purple undertone. It compliments medium skin tone as a everyday pink.
![]() |
| Illamasqua lipstick in Wanton |
I can't say enough about this foundation! I feel like it needs a blogpost just to itself because it is such an amazing full coverage foundation or concealor. I love it for myself and for clients. Mix this with any foundation (any really) and you will get a gorgeous full coverage foundation or medium (whichever you prefer). Invest in one of these and mix it with any other foundation! I wouldn't suggest wearing it by itself unless you have really bad skin as it is very full coverage and it used to cover birthmarks and tattoos.
![]() |
| Illamasqua rich liquid foundation in RF200 |
This lipstick is the perfect pink summer bright! It has a lilac undertone which I reckon will look gorgeous in summer to achieve that bright lip.
![]() |
| Illamasqua lipstick in Welt |
This highlighter is unlike the other Mac MSFs. Its less glittery, the particles are much smaller so it applies more sheerly but also more naturally. Its a nice light gold and has subtle blue, orange and yellow veining through it i think it would give such a nice candlelit effect to the face so I am really looking foreword to using it, MSFs from Mac are their best products in my opinion and really worth the money they last ages!
![]() |
| Mac MSF in lightscapade |
This eyeshadow is a matt black with silver glitter. I think it would look create on a dramatic smokey eye or blended up from the lash line. The glitter is quite prominent when the eyeshadow is applied heavily and thats what I love which is why I want to try it out with a intense smokey eye.
![]() |
Mac eyeshadow in black tiedWhat do you think?What are your new makeup additions?
Let me know in the comments below
Thankyou for reading and supportingLove alwaysSanna
xxx
|
Tuesday, 24 July 2012
Natural everyday smokey eye using drugstore makeup!
Before I get into this post can i just say...
THANK YOU!
I have received a lot of support in making this blog and I have had a lot of views considering I've only had this blog for about 8 days. I appreciate every single person whether I know you personally or not for reading my blog and leaving positive feedback. Leave requests in the comments below on blogposts you would like to see and I'll try my best to get them to you. xxx
Ok.. on to the fun stuff!
Heres a step-to-step guide on how to create a everyday brown smokey eye. I chose the colour brown because black can be overpowering for everyday and is better for evening looks. To add, I think brown is good for people with small eyes as it is a colour that is warm and can open up the eyes if worn properly.
Remember you don't need to use the exact products I used have a look in your makeup collection for something similar instead of going out and buying everything!
YOU WILL NEED...
-Sleek storm eyeshadow palette
-Maybelline colour tattoo in on and on bronze
-Maybelline 2 in one impact shadow liner (brown)
-Bourjois volumizer mascara
To start, you will need a blank canvas. So apply concealor underneath your eyes and on your eyelids. This will ensure the eyeshadows will apply true to their pan form.

Secondly, apply your maybelline colour tattoo. Pat on with your ring finger. Remember its a natural everyday look so we don't want a block of bronze, we want a sheer bronze wash of colour. These colour tattoos are really good for everyday because they do not budge, which means no creasing throughout the day.

Next, using your maybelline eye studio liner or brown eyeliner, line your lash line. Don't be afraid to go quite thick because we are going to blend it out using our ring finger to give a softer more natural look.

Then take this matt brown shade from the storm palette and blend this through your crease. For people who want their eyes to appear larger then blend this just above your crease to give the allusion of more eyelid space. Go over the top of the crease with your ring finger to ensure there is no harsh lines and the crease looks perfectly natural and blended.
After this take this matt black shade and create a wing like you would with eyeliner. For tips how to get the perfect wing read my blog post on perfect cat liner. For small eyes I advise not taking this in all the way to the tear duct area as lining our eyes all the way with black can close them up sometimes making them even smaller. Starting from where your lashes start is a good way to make eyes appear bigger as attention is not drawn to the whole of the top lid. Going thinner at the beginning is also a useful tip for elongating small eyes or even big eyes.
To soften this look and make it look pretty I blended this shimmery brown eyeshadow where we applied the black, it also blended the black shadow making the look less dramatic and more wearable.

Add some highlight! Taking this champagne highlight colour use this on your brow bone and in your tear duct area to brighten up the eyes.
For people with small eyes putting shimmery colours in the tear duct
area can really open the eyes up. Putting a skin colour eyeliner in the waterline can also open eyes up, brightening them here I used Illamasquas medium pencil in hex.
For me, I really hate my eyes appearing small so I wear false lashes! Here I applied some natural false lashes and some mascara to my lower lashes opening my eyes up. If you don't need eyelashes just apply mascara and you're good to go.
![]() |
| Maybellines eye studio liner half way to add some drama but still give me larger looking eyes. |
![]() |
| Illamasqua pencil in hex to open up my eyes. |
Monday, 23 July 2012
July favourites
Its coming to the end of July and I thought I would share with you guys my favourite beauty products that I have especially enjoyed in July!
COLLECTIONS 2000 LASTING PERFECTION FOUNDATION
I discovered this foundation this month and I am really impressed with it! It has a really good staying power and the colour matches me really well (which is hard for me when looking for a foundation). I like that it has a yellow undertone which blends with my skin perfectly, and for the price I would definitely be purchasing again.
ILLAMASQUA LIPSTICK IN DRENCH
![]() |
| swatch is one swipe of the lipstick. WOW! |
I find it so hard to find good matte lipsticks at affordable prices and I have to say this lipstick (which I got in the illamasqua sale for £7.50) is a stunning colour and finish! It is in-between a red and pink and has amazing colour payoff in one swipe. I like wearing this colour as a lip stain applying it sheerly then blending it into my lips with my finger. £7.50! A total bargain my revlon lipsticks are more than that!
ILLAMASQUA LOOSE POWDER
This loose powder absorbs the oil on my face without giving me cake face. I have a dry complexion so hate it when powders make me even dryer, but this one sets my makeup perfectly. I also love that this powder has a yellow undertone so it blends really well into my skin.
![]() |
MAYBELLINE GEL LINER |
This liner is as good as mac backtrack fluid line. It does not smudge, transfer and stays on all day! I love it when doing clients as I am so certain it won't budge even on oily lids. Ive had it for about 3 months and have used it loads and I'm not even near the end of it. Dust got into it when it dropped on my dressing table but when I use it, it doesn't pick up the glitter- so Im happy.
Leave your July favourites, have any of you tried these products, what do you think?
xxx
Sunday, 22 July 2012
A little bit about me and makeup!
I'm fairly new to blogging and still trying to figure it out and many of you who are reading my blog most likely don't know me on a personal level or know what I can do with makeup as you haven't seen any pictures!
I don't think I'm a super professional at makeup, but I am proud of my work.
I am a self-taught makeup artist at 16 and have been interested in makeup since I was very young. I love experimenting with makeup and love art. Makeup is something I enjoy doing.
I have started doing makeup professionally now, which I love love love! Getting paid is the bonus!
When doing makeup I believe a makeup artist should listen to the client.
Not everybody wants a dramatic look or simple look.
Some people like bright colours some don't.
I also think its important to do makeup that will suit the client. For example their eye shape or complexion. I've been upset so many times by a makeup artist giving them a specific description to how i have wanted my makeup done and they've just done what they think would look nice and made my eyes look smaller than they are!
Ok.. over with the rant...
Heres just a few looks I have created (on myself), sorry for the rubbish quality, all photos were taken off my iPhone or Macbook.
Comment tell me what you think/ how I can improve, put your ideas foreword they're appreciated!
I don't think I'm a super professional at makeup, but I am proud of my work.
I am a self-taught makeup artist at 16 and have been interested in makeup since I was very young. I love experimenting with makeup and love art. Makeup is something I enjoy doing.
I have started doing makeup professionally now, which I love love love! Getting paid is the bonus!
When doing makeup I believe a makeup artist should listen to the client.
Not everybody wants a dramatic look or simple look.
Some people like bright colours some don't.
I also think its important to do makeup that will suit the client. For example their eye shape or complexion. I've been upset so many times by a makeup artist giving them a specific description to how i have wanted my makeup done and they've just done what they think would look nice and made my eyes look smaller than they are!
Ok.. over with the rant...
Heres just a few looks I have created (on myself), sorry for the rubbish quality, all photos were taken off my iPhone or Macbook.
Comment tell me what you think/ how I can improve, put your ideas foreword they're appreciated!
Saturday, 21 July 2012
Perfect Cat liner!
Hey guys..
For the second step I took my gel liner on my pointed brush and following my lash line I drew a line following it going up, (repeat on other eye so you get the same size line).
So I hear a lot people find getting the perfect liner really tricky
This is my technique to getting it really sharp and the same on both sides, thought I would share it with pictures, when I do a blogpost on a look I have created you will see the liner better
For now I just did a basic liner and took pictures as I went along
All I did for the first step was apply my concealor & eyeshadow base
YOU WILL NEED-
-Gel liner, kohl liner or liquid liner
-Concealor & an eyeshadow base
-Brow pencil or eyeshadow if you need it!
-Lashes
All I did for the first step was apply my concealor & eyeshadow base
![]() |
| My eye.. bare! |
Then fill in your brows to shape the eyes. Add a white or skin coloured liner to your waterline to give a bright eyed look (I chose skin coloured liner as I think it looks more natural).
![]() |
| Add mascara on your lower and upper lashes |
To add some drama and make the look a little more sophisticated, using a crease brush take a matt brown eyeshadow about 2 or 3 shades darker than your skin tone and define your crease ( I used urban decay buck). Then add a darker eyeshadow to the outer edge of the crease and wing out ( I used urban decay busted).
For an evening look add some black kohl pencil underneath the eyes and in the waterline (making sure to blend and joining the line with the cat liner). Then add a brow highlight (I used urban decay virgin).
For more drama! Add some more of the dark shade in the crease and add lashes that wing out to add to the cat eye shape.
TIP!- If your wing isn't as sharp as you would like, to clean it up take a cotton bud and swipe it up from your wing and you should get a defined sharp line with a pointed edge!
Then your done! Thank you for taking the time to read, hope you found useful x
Subscribe to:
Posts (Atom)